Create a campaign
After this guide, your agent will be calling or WhatsApp-ing a whole list of contacts on its own. You'll build the campaign in a step-by-step wizard — we'll walk through every screen.
phone_number columnPick the right channel first
The channel decides how the campaign runs and which steps the wizard shows. Voice campaigns dial each contact live; WhatsApp campaigns send a message and wait for replies.
| Channel | How it runs | Wizard steps |
|---|---|---|
| Voice Call | Real-time dialer. The agent calls each contact within an operating-hours window and can retry failed or unanswered calls. | 4 — Sender & Agent, Recipients, Schedule, Review |
| Sends an approved WhatsApp template, then optional follow-ups if there is no reply. A reply hands the conversation to the agent. | 5 — Sender & Agent, Message, Recipients, Send Rules, Review |
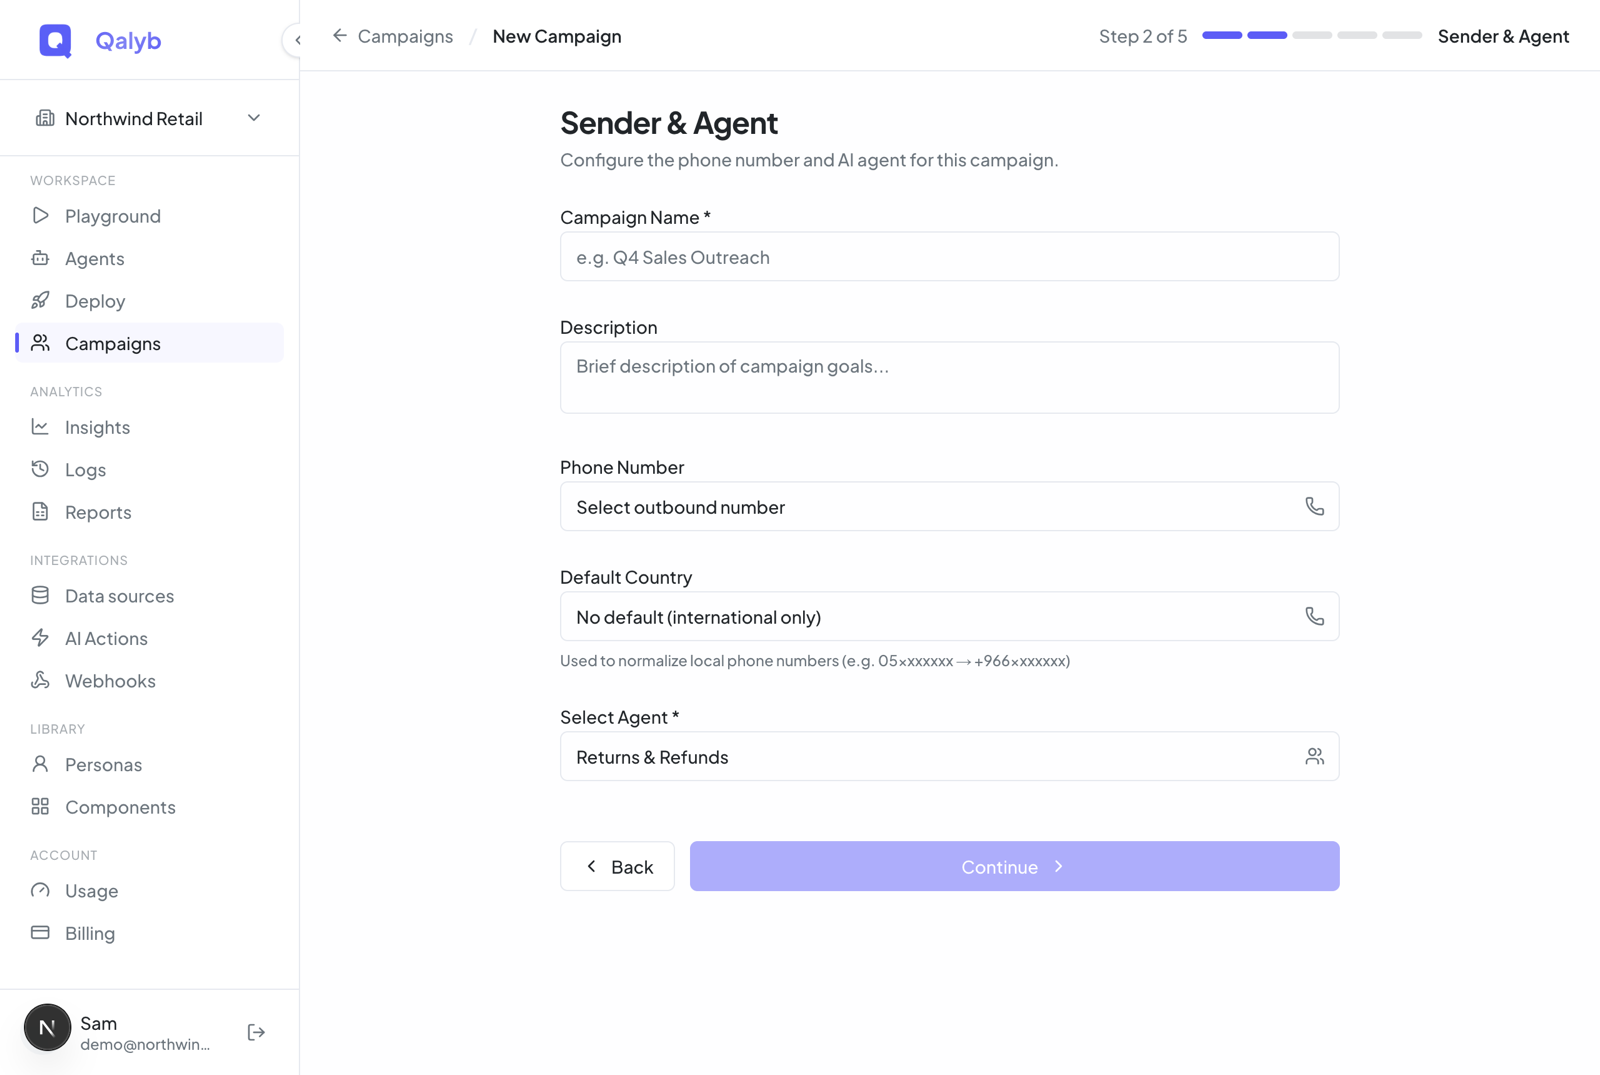
In the dashboard, click Campaigns in the sidebar (Workspace group), then New Campaign at the top-right. The wizard opens straight on the Sender & Agent step of a voice campaign.
Enter a Campaign Name (required, up to 100 characters) and an optional Description. Pick the sender — a Phone Number and Default Country for voice, or a WhatsApp Channel for WhatsApp. Then choose the agent that will handle the conversations. Its required and optional prompt variables appear as pills, so you know which CSV columns you'll need.
For WhatsApp, enter the Template Name and Language Code (for example en or ar), then map the template's {{1}}, {{2}} variables to CSV column names. A live preview updates as you type.
Upload your CSV — the Template button downloads a starter file with the right columns. A name column is optional, and any extra columns become per-contact data your agent and messages can use:
phone_number,name,appointment_time
0501234567,Sara,"Tuesday 3pm"
0559876543,Omar,"Wednesday 11am"
+971501112233,Layla,"Thursday 5pm"
The right-hand pane previews every parsed contact and flags each row as valid, invalid, duplicate, or assumed (a local number converted using your Default Country). You can upload up to 50,000 contacts per campaign.
Voice campaigns get a Schedule step: send immediately or schedule for later, set Operating Hours for the daily call window, and optionally turn on Retry Failed Calls. WhatsApp gets a Send Rules step: a Send Window, a Campaign Expiry, and an optional follow-up cadence. The details for both are just below.
The final step shows a Campaign Summary table. Check the details, then click Launch Campaign. You land back on the campaigns list with the new campaign running.
Picking the sender
| Channel | Sender field | Notes |
|---|---|---|
| Voice | Phone Number + Default Country | The number must be active and owned by your organization. GCC countries are listed first; Default Country converts local numbers (for example 05xxxxxxx → +966xxxxxxx). |
| WhatsApp Channel | The list shows your connected WhatsApp channels. |
Timing for voice campaigns
- Send immediately or Schedule for later — scheduling adds a Timezone and a Start Date & Time, which must be in the future.
- Operating Hours — a daily call window (start and end). Set both or neither; calls outside the window are held until the next window opens.
- Retry Failed Calls — when on, set Max Attempts (1–5) and Wait Between Retries (5 minutes to 24 hours). Only failed and no-answer calls are retried.
Send rules for WhatsApp
- Send Window — quiet hours that hold messages until an allowed time.
- Campaign Expiry — choose No expiry or 3, 7, 14, or 30 days.
- Follow-up cadence — toggle Follow up if no reply to add up to 10 steps. Each step has a wait (minutes, hours, or days; minimum 5 minutes) and its own approved Template Name, Language Code, and variable mapping.
Follow-ups stop automatically as soon as a contact replies, opts out, bounces, or fails. A reply is the goal — it hands the conversation to your agent and cancels any pending nudges. For the full guide to cadences, see Contacts & follow-ups.
For developers
The wizard posts to POST /campaigns. The request body is keyed on channel, so voice and WhatsApp each require different fields — voice needs callWindowStart and callWindowEnd together, and WhatsApp needs a messagingChannelId plus template config. The endpoint requires the campaigns:write permission, and invalid phone numbers are rejected with the offending rows listed.
curl -X POST https://api.qalyb.ai/campaigns \
  -H "Authorization: Bearer sk-live-..." \
  -H "Content-Type: application/json" \
  -d '{
    "channel": "voice",
    "name": "Eid Renewal Reminders",
    "description": "Call lapsed members about Eid offers.",
    "agentId": "agt_abc123",
    "phoneNumberId": "pn_966xxxxxxxx",
    "defaultCountry": "SA",
    "callWindowStart": "09:00",
    "callWindowEnd": "18:00",
    "retry": { "maxAttempts": 3, "waitMinutes": 60 },
    "contacts": [
      { "phone_number": "0501234567", "name": "Sara" },
      { "phone_number": "0559876543", "name": "Omar" }
    ]
  }'